How to Customize PDF Signature Fields: A Step‑by‑Step Guide with QuickSign
Customize PDF signature fields guide with QuickSign. Follow our step‑by‑step tutorial to build secure, professional e‑sign workflows in minutes.

How to Customize PDF Signature Fields: A Step‑by‑Step Guide with QuickSign
When your contracts, NDAs, or proposals move through inboxes instead of conference rooms, the way you design and place signature fields in your PDFs directly affects how fast you get them signed. Poorly placed or confusing fields lead to delays, errors, and frustrated clients.
In this guide, you’ll learn how to customize PDF signature fields using QuickSign—a modern, affordable e‑signature platform that lets you go from draft to signed document in minutes. We’ll walk through practical, step‑by‑step workflows tailored for business professionals, from generating the contract with AI to fine‑tuning every signer field.
Key idea: With QuickSign, you don’t need advanced PDF software to build fillable signature fields. You upload any PDF, drag‑and‑drop the exact fields you need, assign them to signers, and send—often in under 60 seconds.
What You’ll Learn
- How PDF signature fields work and why their design matters
- How to generate a contract or NDA with QuickSign’s AI in seconds
- How to upload an existing PDF and customize its signature fields
- Best practices for assigning fields to multiple signers
- Tips to avoid common mistakes that slow down signing
What You’ll Need
- A QuickSign account (free to start at QuickSign.it)
- A PDF document:
- Either generated using AI Document Generation in QuickSign, or
- An existing PDF (contract, agreement, form, etc.)
- Basic details about your signers (names and email addresses
)
Estimated time: 5–10 minutes for your first document. Once you’re familiar, customizing PDF signature fields and sending for e‑signature typically takes under 60 seconds in QuickSign.
Why Customized PDF Signature Fields Matter
Most modern e‑signature tools (including Acrobat-based workflows and form builders) let you embed signature fields in PDFs so signers can complete them without printing. When done well, this:
- Reduces errors (no missing signatures or dates)
- Speeds up turnaround times by guiding users step by step
- Improves legal defensibility with clear, traceable signature areas
Traditional methods often require you to edit the PDF itself (for example in desktop software), define form fields, then upload to a separate e‑signature platform. That extra step is where many teams lose time and introduce inconsistencies. Modern tools like QuickSign move the field customization into the browser with intuitive drag‑and‑drop, so you can visually place fields exactly where they belong without touching the original PDF layout. (support.procore.com)
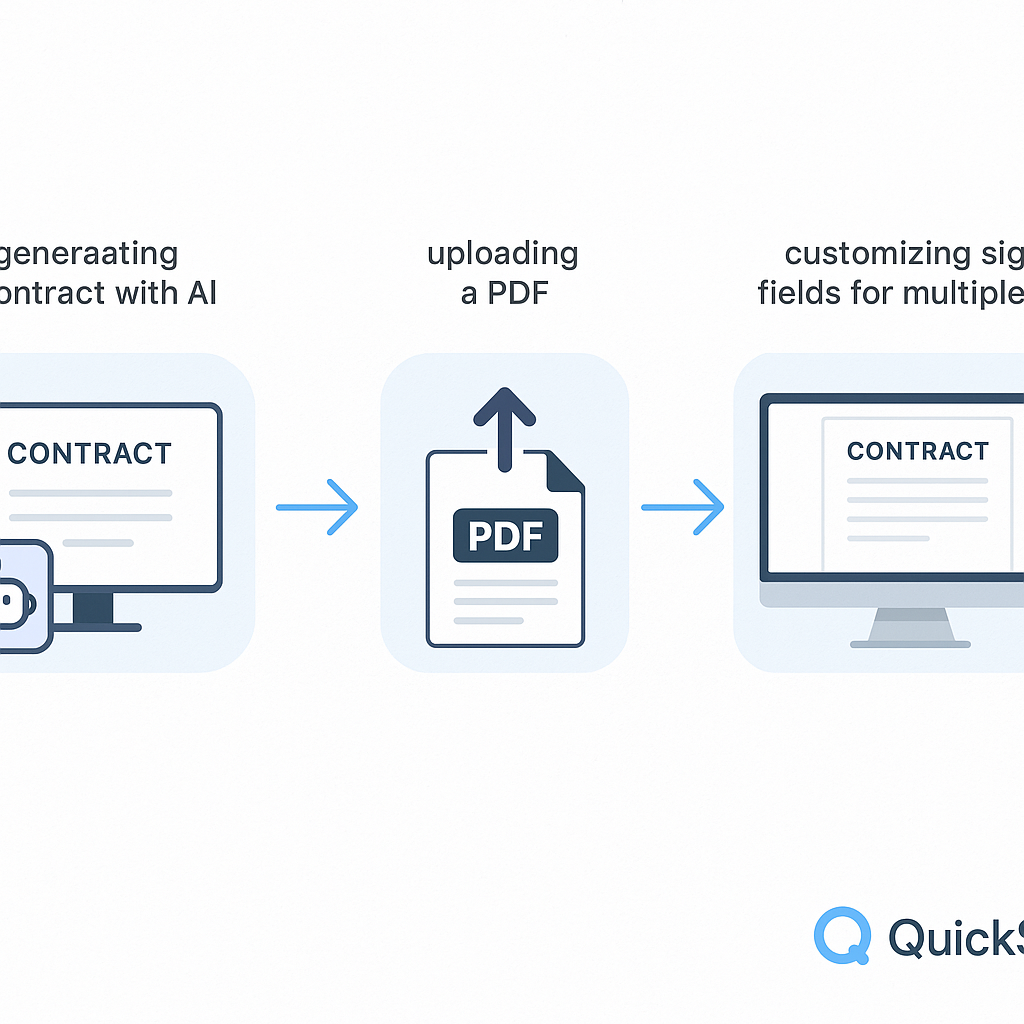
Step 1: Create or Prepare Your Document in QuickSign
Option A: Generate a Contract with QuickSign’s AI (Fastest)
If you don’t already have a contract or form prepared, you can use AI Document Generation in QuickSign to draft a professional, legally sound document from scratch.
- Log in to your account at QuickSign.it.
- On the dashboard, click the “Generate with AI” or “Generate Document” button.
- In the prompt box, describe the document you need, for example:
- “A one‑page mutual NDA between a marketing agency and a client, governed by California law, with signature lines for both parties.”
- “A freelance design services agreement with milestone‑based payments, 30‑day net terms, and ownership transfer on final payment.”
- Click “Generate”. QuickSign’s AI drafts the agreement for you in seconds.
- Review the content and edit any clauses directly in the editor (scope, payment terms, dates, etc.).
- Click “Save & Continue”. QuickSign automatically converts it into a ready‑to‑sign PDF behind the scenes.
Pro tip: On the generous free tier, you can generate 2 documents with AI and send 1 document to unlimited recipients at no cost—perfect for testing how customized fields work on your real agreements.
Option B: Upload an Existing PDF
If you already have a contract or form, you can skip AI drafting and just focus on customizing the signature fields.
- From the QuickSign dashboard, click “Upload Document” or “Upload to Sign”.
- Drag and drop your PDF into the upload area or click “Browse Files” to choose it from your computer.
- Wait a moment while QuickSign processes the file and takes you to the field editor.
Once your document is in QuickSign (via AI or upload), the process of customizing signature fields is the same.
Step 2: Add Recipients and Define Signers
Before you place fields, you should tell QuickSign who needs to sign. This allows you to assign each field to the correct person later.
- At the top of the document editor, click the “Recipients” or “Add Signers” section.
- For each signer:
- Click “Add Recipient”.
- Enter their Name and Email.
- Choose the role if prompted (e.g., “Needs to Sign,” “Receives a Copy”).
- If you need a specific order (e.g., client signs after your internal approver), enable signing order and drag recipients into the correct sequence.
- Click “Save Recipients” or simply return to the document view.
Best practice: Use clear labels like “Client Representative” and “Vendor” for recipients. This will make it easier to see whose fields you’re placing in the sidebar when customizing your PDF.
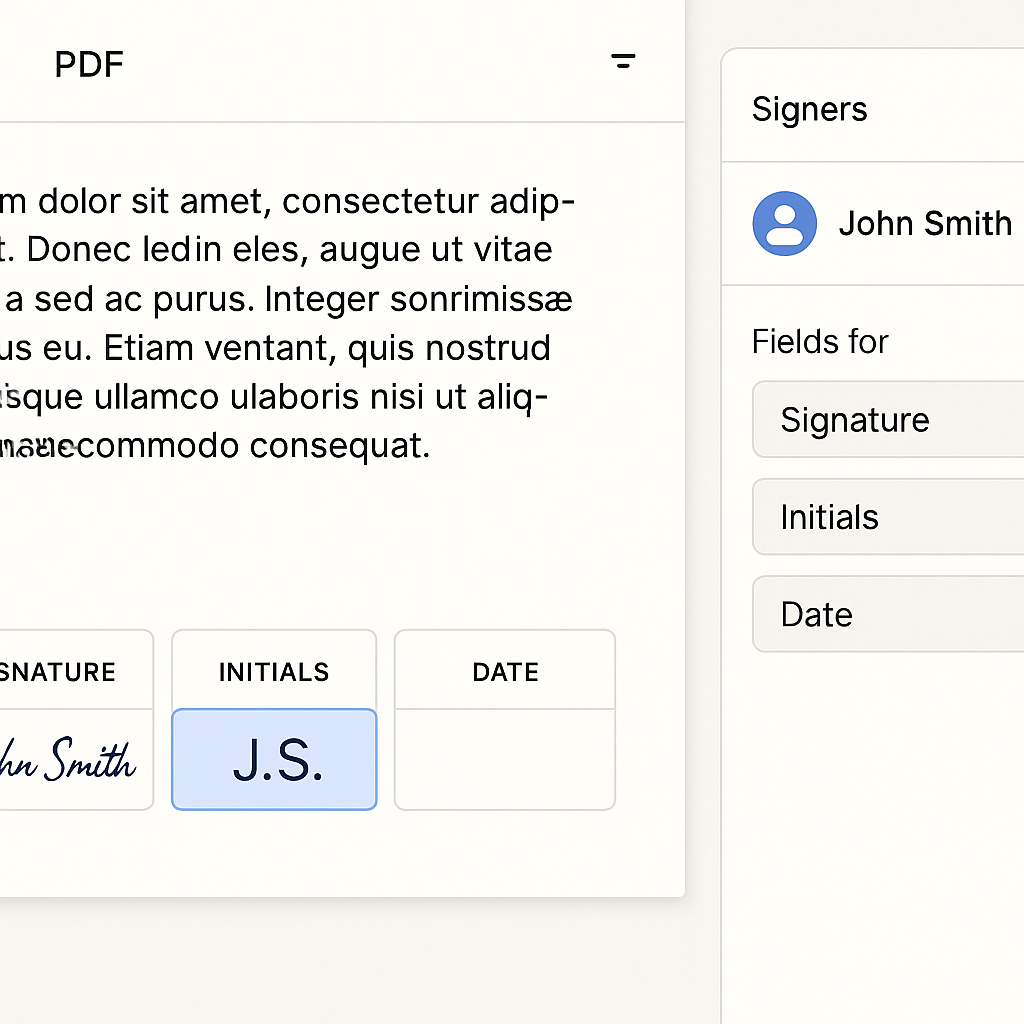
Step 3: Open the Drag‑and‑Drop Field Editor
Now you’re ready to create and customize the interactive fields directly on your PDF.
- From the document screen, click “Prepare for Signing” or “Edit Fields”.
- You’ll enter the visual editor, where you’ll see:
- Your PDF pages in the main area
- A fields toolbar on the left or right (depending on your layout) with options like:
- Signature
- Initials
- Date
- Text
- Checkboxes / Radio buttons (if available)
- A recipient selector at the top of the toolbar so you can assign each field to a specific signer
This editor replaces the need for complex desktop PDF tools. Instead of pre‑defining form fields in Acrobat or similar software, you visually drag and drop exactly what you need onto the PDF within QuickSign, similar to leading e‑signature platforms that support custom field placement. (signnow.com)
Step 4: Customize Signature Fields on Your PDF
4.1 Place Primary Signature Fields
- In the recipient selector, choose the first signer (e.g., “Client Representative”).
- From the fields toolbar, click and hold “Signature”.
- Drag the Signature field onto the appropriate line on the PDF (e.g., “Client Signature” line) and drop it.
- Resize the field if needed by dragging the corners so it neatly fits the signature line.
- Repeat for any additional pages where that signer must sign (such as final acknowledgment pages).
Next, switch to your second signer:
- Change the recipient selector to the second signer (e.g., “Vendor” or “Your Company”).
- Drag a new Signature field to their signature line and adjust its size.
Pro tip: Color‑coded borders around fields (by recipient) help you quickly check that the correct person is assigned to each signature area before sending.
4.2 Add Initials Fields for Each Page
For high‑value or long‑term contracts, having signers initial each page helps confirm they’ve reviewed the entire document.
- Go to page 1 of your PDF in the editor.
- Select the first signer in the recipient selector.
- Drag an “Initials” field to the bottom‑corner initial line (e.g., “Initials: ____”).
- Copy the placement across pages if QuickSign offers a “Duplicate to all pages” or similar shortcut. Otherwise, manually place an Initials field on pages 2, 3, etc.
- Repeat steps 2–4 for the second signer if both need to initial each page.
4.3 Insert Date and Text Fields
A professional signing experience typically includes auto‑filled dates and small text fields (e.g., printed name, job title).
- For each signer, locate the line that says something like “Date:” near their signature area.
- From the toolbar, drag a “Date” field to that line.
- In the field settings panel (usually appears when selected), set:
- Default value: “Current date when signed” if available
- Format: e.g., MM/DD/YYYY (or your regional preference)
- For printed name or title:
- Drag a “Text” field to the “Print Name” or “Title” line.
- Set the field as Required so the signer can’t skip it.
Best practice: Use required Date and Text fields to avoid back‑and‑forth emails asking, “Can you confirm your title?” or “What date did you sign?”
4.4 Make Fields Required or Optional
You control which fields must be completed before the signer can finish.
- Click any field you’ve placed (Signature, Initials, Date, Text).
- In the field settings, toggle “Required” on or off.
- Use Required fields for:
- All signature fields
- Critical initials confirming acceptance of key clauses
- Essential data (e.g., company name, legal full name, tax ID if relevant)
Step 5: Assign Fields Correctly for Multi‑Signer Workflows
Multi‑party agreements are where customized PDF fields really shine. Mis‑assigned fields (e.g., client signing in your signature box) can cause legal confusion. Proper assignment in QuickSign prevents this.
- In the editor, use the recipient selector to filter by signer and review their fields:
- Select “Client” to show only their fields.
- They have the correct number of Signature and Initials fields.
- They don’t have any fields on lines meant for your company.
- Repeat for “Vendor” or any internal approvers.
- Adjust signing order if needed (e.g., internal approval first, then client).
Because QuickSign supports seamless sending and routing, you don’t need to manage multiple PDF versions. One customized set of fields guides each signer through their part in the correct order.
Step 6: Preview the Signing Experience
Before you send a critical agreement, preview ensures everything looks right from each signer’s point of view.
- Click “Preview” in the field editor (often near the top right).
- Use the “View as” dropdown to select a signer (e.g., “Client”).
- Walk through the document as if you’re that signer:
- Check that the guided experience jumps from field to field clearly.
- Confirm that all required fields are present and positioned correctly.
- Verify that optional fields are indeed optional.
- Switch to the next signer and repeat.
- If anything looks off, click “Back to Edit”, adjust fields, and preview again.
Pro tip: For your first few critical agreements, send a test version to yourself or a colleague using a personal email. This lets you see the full email + signing flow before sending to clients.
Step 7: Send the Document for Signature in Seconds
Once your PDF signature fields are configured, sending is straightforward.
- From the editor, click “Send for Signature”.
- Review the recipient list and signing order.
- Customize the email subject (e.g., “Please Sign: Marketing Services Agreement”).
- Add a short, clear message if desired:
- “Hi Alex, here’s the updated agreement with your requested changes. Please review and sign by Friday.”
- Click “Send”.
Unlike traditional per‑seat solutions, QuickSign uses affordable flat‑rate pricing starting at $15/month for the whole team, making it cost‑effective to let anyone on your team send documents with customized fields without worrying about extra user fees.
Step 8: Track, Remind, and Store with Real‑Time Status
Properly designed fields are only half the story—you also need visibility into who has signed and who is holding things up.
- Open your QuickSign dashboard.
- Locate your document in the list (use filters like “Pending,” “Viewed,” “Signed”).
- Click the document to see the timeline:
- When each recipient received the email
- When they opened and viewed the document
- When they completed signing
- If someone is slow to sign, click “Send Reminder” or enable automatic reminders so QuickSign nudges them for you.
- Once all parties sign, QuickSign stores the completed, signed PDF securely in your account, where you can download, share, or archive as needed.
Key benefit: Real‑time tracking plus well‑designed fields means you always know exactly where the process stands—and you rarely need to chase signatures manually.
Real‑World Example: Customizing Fields for a Two‑Party NDA
Imagine you’re a marketing consultant about to share a strategic roadmap with a new client. You want an NDA signed quickly, with no confusion.
- Generate with AI: In QuickSign, click “Generate with AI” and prompt: “Mutual NDA between a marketing consultant and a client, California law, 1‑year term, no assignment without consent.”
- Add signers: Add yourself and your client contact as recipients.
- Customize fields:
- Client: Signature, Date (auto‑fill), Printed Name, Title
- You: Signature, Date, Printed Name, Title
- Initials fields on each page for both parties
- Preview: View as the client to confirm they’re guided through only their fields.
- Send: Click “Send for Signature”; your client gets a clean, mobile‑friendly flow.
- Track: Use real‑time status to see when they open and sign; download the final PDF for your records.
That entire flow—from AI drafting to fully signed NDA—often completes faster than manually editing fields in desktop PDF software and emailing attachments back and forth.
Helpful Video References on PDF Fields (Conceptual)
While these videos use other tools, they’re useful for understanding the general concepts of creating and customizing PDF fields. You can apply the same ideas inside QuickSign’s drag‑and‑drop editor:
Creating Blank Signature Fields in Fillable PDFs
Advanced Customization Ideas for Digital Signature Fields
Typing and Writing on Any PDF
In QuickSign, you get the same outcomes (and typically less complexity) by simply uploading the PDF and using the built‑in field editor—no need to pre‑build forms in separate apps.
Quick Summary: Customizing PDF Signature Fields in QuickSign
- Prepare your document: Either generate it with AI Document Generation in QuickSign or upload an existing PDF.
- Add recipients: Define all signers and, if needed, set the signing order.
- Open the field editor: Use QuickSign’s drag‑and‑drop field placement to visually add Signature, Initials, Date, and Text fields.
- Customize fields: Place fields on the correct lines, assign them to the right signer, and mark essential ones as Required.
- Preview: View the document as each signer to ensure a smooth, error‑free experience.
- Send in seconds: Use QuickSign’s seamless sending to email the document for signature—often in under 60 seconds.
- Track and store: Monitor status with real‑time tracking and keep signed PDFs securely stored in your QuickSign account.
Ready to simplify your document signing? Try QuickSign for free - generate 2 documents and send 1 document to unlimited recipients at no cost. No credit card required.