How to Track Document Signatures in Real Time with QuickSign
Track document signatures in real time with QuickSign. Learn simple, secure steps to monitor every signature’s status instantly and streamline your workflow.
How to Track Document Signatures in Real Time with QuickSign
Why Real-Time Signature Tracking Matters
When you send a contract or agreement, the most stressful part is often the wait: Has the client opened it? Is legal still reviewing it? Did someone miss the email entirely? Modern e-signature tools solve this with real-time document tracking, giving you instant visibility into who has opened, viewed, and signed each document.
Studies show that e-signatures can cut signing time from days to minutes, dramatically accelerating sales cycles and internal approvals. Businesses report reducing turnaround times by over 80% after adopting e-signature solutions, thanks in part to real-time visibility and automated reminders. (esignly.com)
QuickSign takes this even further by combining real-time tracking with AI-powered document generation, drag-and-drop field placement, and flat-rate pricing—making it a modern, user-friendly choice for teams that need to move fast without enterprise-level complexity or cost.

What You’ll Learn in This Guide
In this tutorial, you’ll learn how to:
- Generate or upload a document in QuickSign
- Add signature, text, date, and initial fields with drag-and-drop
- Send your document to one or many recipients
- Track every signature in real time—from “Sent” to “Signed”
- Use reminders and status filters to keep deals moving
- Leverage audit trails and status logs for co
mpliance and reporting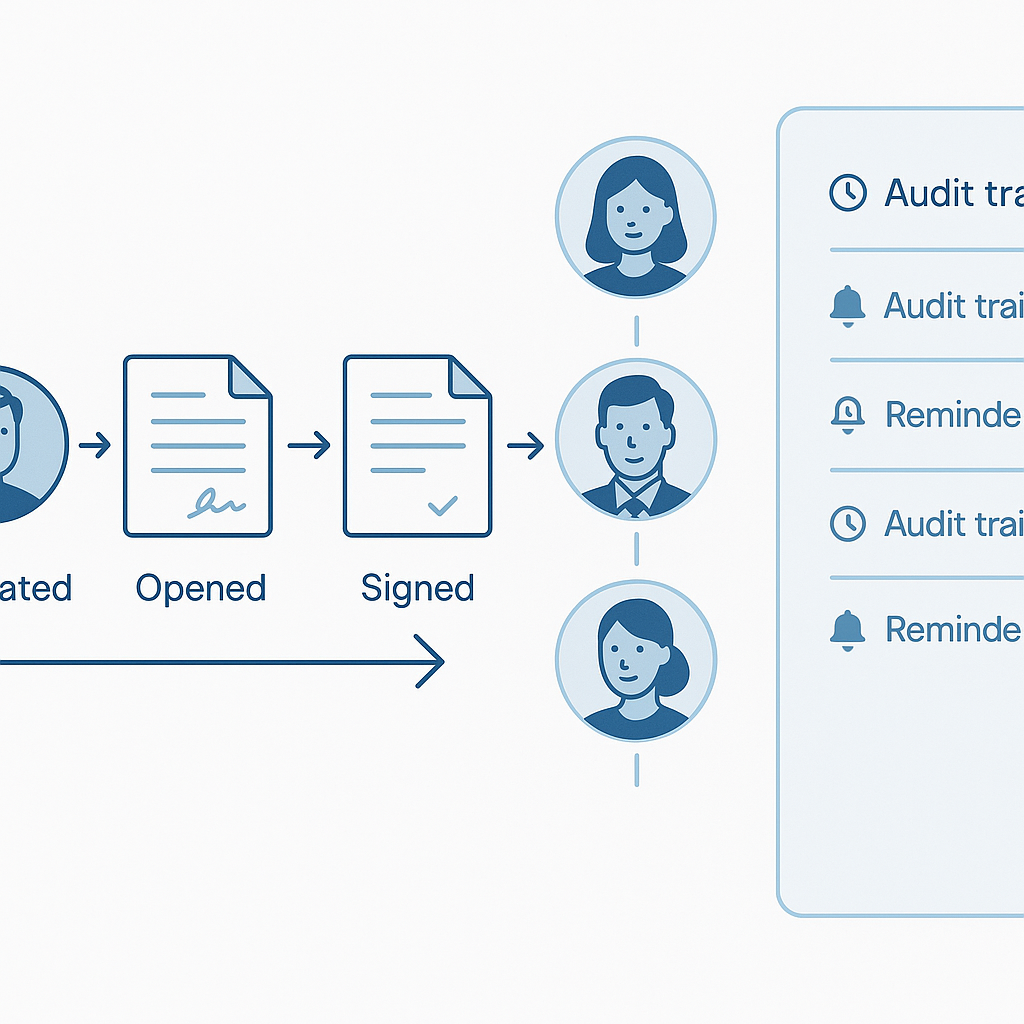
Key takeaway: Real-time signature tracking turns a black box (“I sent it, but who knows?”) into a visible workflow—so you can follow up intelligently, forecast accurately, and close faster.
What You’ll Need
- A QuickSign account (free tier is enough for this tutorial)
- A document to sign:
- Either generated with QuickSign’s AI (contracts, NDAs, agreements, etc.)
- Or an existing PDF/Word file you can upload
- The email addresses of your recipients (clients, partners, internal approvers)
Estimated time: Setting up and sending a trackable document takes under 60 seconds with QuickSign. Tracking is instant and continuous once sent.
How Real-Time Signature Tracking Works (In Plain English)
Most modern e-signature platforms log each event in the signing process—when a document is created, sent, opened, viewed, and signed. This creates a complete audit trail with timestamps and signer details, which is not only useful operationally but also critical for compliance and legal validity. (umatechnology.org)
With QuickSign, these events are surfaced in a real-time status dashboard so you don’t have to dig through emails or spreadsheets. At a glance, you can see:
- Which documents are Draft, Sent, Viewed, Partially Signed, or Completed
- Which recipients have already signed and who is still pending
- Exact timestamps for each event for audit and compliance purposes
Pro tip: Businesses that use tracking dashboards to see who has opened and signed documents can identify bottlenecks quickly and improve process visibility across sales, HR, legal, and finance. (thanksroger.com)
Step 1: Sign Up or Log In to QuickSign
To get started:
- Go to https://quicksign.it in your browser.
- Click the “Get Started Free” or “Sign Up” button on the homepage.
- Create your account using your business email and a secure password.
- Verify your email if prompted, then log in to your dashboard.
On the free tier, you can generate 2 documents and send 1 document to unlimited recipients, which is more than enough to test real-time tracking across a full workflow.
Step 2: Generate or Upload a Document
Option A: Generate a Contract with QuickSign AI
One of the biggest time-savers in QuickSign is its AI Document Generation. Instead of fiddling with templates in Word or copying old contracts, you can generate a fresh, legally structured document in seconds.
- From your QuickSign dashboard, click the “Generate Document” button.
- In the prompt box, describe what you need, for example:
- “Mutual NDA between a US software company and a marketing agency, 1-year term, standard confidentiality clauses.”
- “Simple consulting agreement for a freelance UX designer, monthly retainer, IP transfer to client.”
- Click “Generate”. In a few seconds, QuickSign AI drafts your document.
- Review the generated text. You can edit clauses directly in the editor if needed.
- Click “Save & Continue” to move to the field placement step.
Option B: Upload an Existing PDF
If your legal team already has approved language, you can upload that file instead:
- From your dashboard, click “Upload Document”.
- Drag and drop your PDF or click “Browse” to select a file from your computer.
- Once uploaded, QuickSign displays a preview of the document pages.
- Click “Next: Add Fields” to prepare it for signing.
Pro tip: Use AI Document Generation for first drafts, then upload the finalized version after legal review. You still get full real-time tracking either way.
Step 3: Add Signature and Form Fields with Drag-and-Drop
To accurately track who has signed what, you need to tell QuickSign where each person should interact with the document. This is where drag-and-drop field placement shines.
- In the document editor, you’ll see a toolbar on the left (or top) with options like:
- Signature
- Initials
- Date
- Text (for names, titles, amounts, etc.)
- Click the “Signature” field and drag it onto the page where the signer should sign.
- Select the intended signer from the “Assigned To” dropdown (e.g., “Client,” “Internal Approver”).
- Repeat for any other required fields (initials on each page, dates, extra text fields, checkboxes, etc.).
- Use the zoom controls to place fields precisely on dense legal text.
This precise mapping allows QuickSign to know exactly when all required fields for a recipient are completed—triggering the status change from “Pending” to “Signed” in your real-time tracking view.
Key takeaway: Accurate drag-and-drop field placement is the foundation of reliable real-time tracking. If every field is clearly assigned, you’ll always know which signer is holding things up.
Step 4: Add Recipients and Configure Signing Order
Next, you’ll tell QuickSign who needs to sign and in what order.
- Click “Recipients” or the “Add Signers” section in the document setup flow.
- Enter each recipient’s:
- Name
- Email address
- Role (e.g., Client, Vendor, Internal Approver, Witness)
- Choose your signing workflow:
- Sequential signing (A signs, then B, then C)
- Parallel signing (all signers can sign at the same time)
- If needed, drag recipients up or down to reorder the signing sequence.
Real-time tracking will reflect your chosen workflow: in sequential mode, you’ll see which step the document is currently in; in parallel mode, you’ll see which signers have completed their part and who remains.
Step 5: Send the Document for Signature (in Seconds)
Now you’re ready to send—and unlock real-time tracking.
- Click the “Send for Signature” or “Send” button.
- Customize the email subject and message if desired (for example, “ABC Corp – Master Services Agreement for Signature”).
- Review the recipient list and signing order one last time.
- Click “Send Now”.
Within seconds, your recipients receive an email with a secure link to sign. Real-time tracking begins the instant the document is sent—no manual setup required.
Note: Unlike traditional per-seat solutions, QuickSign offers flat-rate pricing at $15/month for the whole team, so you can add more senders and track more documents without worrying about per-user fees.
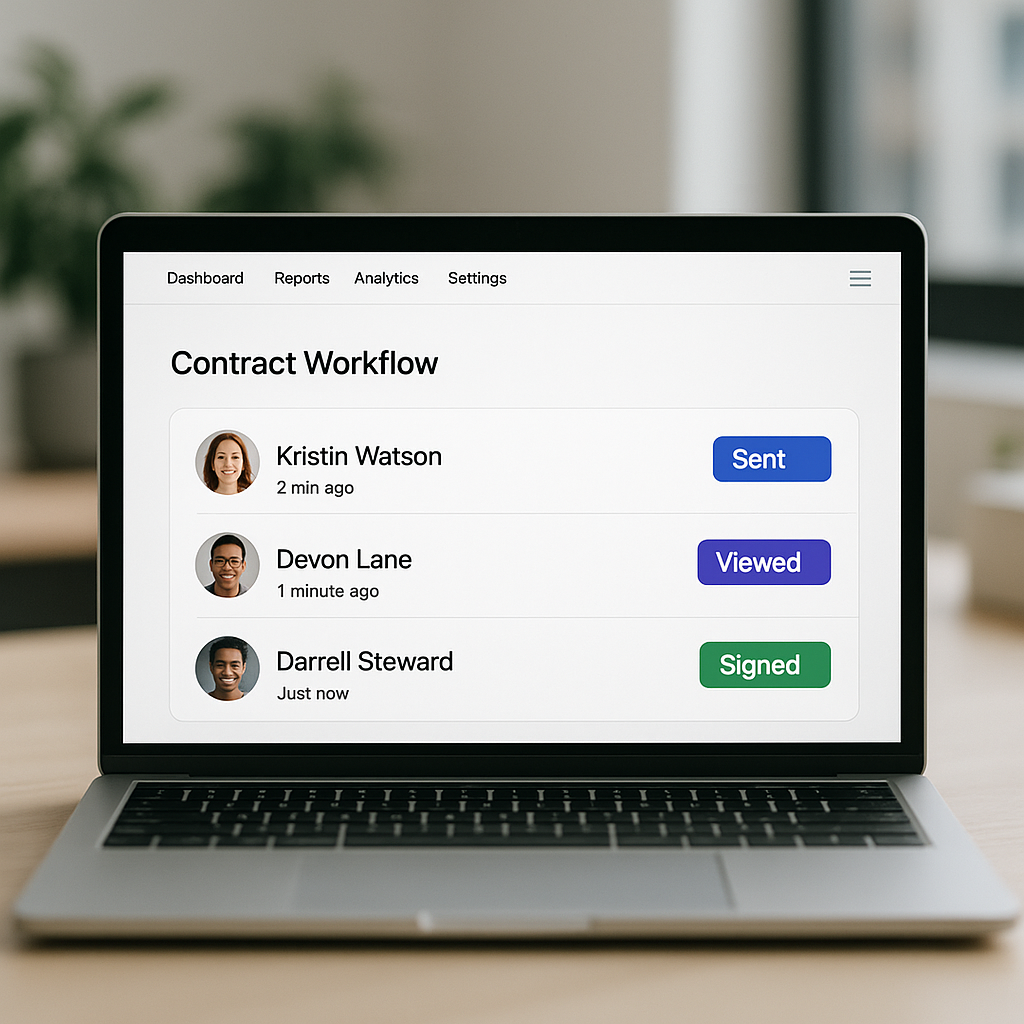
Step 6: Track Document Signatures in Real Time
This is where QuickSign’s real-time tracking feature becomes the star of your workflow.
Using the QuickSign Dashboard
From your main dashboard:
- Click the “Documents” or “Activity” tab.
- You’ll see a list of documents with status indicators such as:
- Draft – Not yet sent
- Sent – Email invitations delivered to recipients
- Viewed – At least one recipient has opened the document
- Partially Signed – Some signers have signed, others are pending
- Completed – All required signatures collected
- Click any document row to open its real-time status panel.
Viewing Per-Recipient Status
Inside the status panel, you’ll see a breakdown by recipient:
- Not Opened – Invitation sent, but email/link hasn’t been opened
- Opened – Recipient clicked the link and viewed the document
- In Progress – Recipient is filling fields but hasn’t completed signing
- Signed – All required fields for that recipient are complete
Each status includes timestamps, so you know exactly when the document moved through each stage. This full audit trail is important for both operational insight and legal defensibility, as many regulations expect you to be able to reconstruct the signing process step by step. (umatechnology.org)
Pro tip: Use the “Viewed but not signed” status as your trigger for a friendly follow-up. Often, a quick nudge right after a document has been viewed significantly boosts completion rates.
Step 7: Automate Reminders and Nudge Slow Signers
Real-time tracking is powerful on its own, but you can go further by automating your follow-up process.
- In the document’s status panel, look for the “Reminders” or “Notifications” section.
- Set up automatic reminders, for example:
- “Send a reminder every 3 days until signed.”
- “Send a reminder 24 hours before the due date.”
- For high-value deals, use the “Send Reminder Now” button next to a specific recipient who’s lagging.
This approach mirrors best practices across digital contract management, where automated nudges paired with clear status visibility help businesses eliminate signature-related bottlenecks and reduce cycle times. (signbulb.com)
Step 8: Access the Full Audit Trail and Download Evidence
Beyond the dashboard, you may need proof that a document was signed properly—especially for high-value contracts, HR paperwork, or regulated industries.
- Open the completed document in QuickSign.
- Click “View Audit Trail” or “View History”.
- Review the event log, which typically includes:
- Document creation and sending times
- Each time the document was opened or viewed
- IP address or device metadata (where applicable)
- Each signing event with timestamps and signer identity
- Click “Download Audit Report” or “Export Log” to save a PDF copy with your signed document.
Audit trails are a core part of why electronic signatures are considered secure and legally enforceable under frameworks like the U.S. ESIGN Act and similar regulations globally. (umatechnology.org)
Key takeaway: Don’t just rely on a signed PDF. Always keep the associated audit trail—especially for agreements that may be reviewed in audits, disputes, or compliance checks.
Real-World Example: Sales Contract with Multi-Party Approval
Here’s what a typical sales workflow might look like using QuickSign and real-time tracking:
- The account executive uses AI Document Generation to draft a new Master Services Agreement in under a minute.
- They add fields via drag-and-drop for:
- Client signature
- Internal finance approval
- Internal legal sign-off
- They configure a sequential workflow: client signs first, then finance, then legal.
- After sending, they watch the real-time status panel:
- Client opens and signs within an hour (status: Partially Signed).
- Finance receives an automatic notification and signs later that afternoon.
- A reminder is automatically sent to legal the next morning; legal signs by lunch.
- The AE downloads the fully signed contract and its audit trail, then pushes the deal forward to invoicing.
From initial draft to signed contract, the entire process can be completed the same day—something that used to take a week or more with paper or unsophisticated digital tools. (cm.com)
Helpful YouTube Resources for Understanding E-Signatures
While QuickSign offers a streamlined, modern interface, it can help to see digital signing in action. These videos provide general context on electronic signatures and tracking:
These tutorials show the broader concepts of digital signatures and tracking. With QuickSign, you get those same capabilities in a simpler, more affordable package—with AI document generation and flat-rate pricing built in.
Why Business Professionals Choose QuickSign for Real-Time Tracking
For many teams, the decision comes down to three things:
- Speed: Generate, send, and start tracking a document in under 60 seconds.
- Visibility: See every step in real time—who’s opened, who’s signed, and where things are stuck.
- Affordability: Generous free tier plus flat-rate $15/month pricing for your whole team, not per seat.
Whether you’re in sales, HR, legal, procurement, or operations, QuickSign lets you standardize your process, reduce manual follow-up, and bring transparency to every agreement your business depends on.
Quick Summary: Steps to Track Document Signatures in Real Time with QuickSign
- Create your account: Sign up at QuickSign.it and log in.
- Generate or upload: Use “Generate Document” to create a contract with AI, or “Upload Document” to import an existing PDF.
- Add fields: Drag-and-drop signature, date, text, and initial fields to the right places and assign them to each signer.
- Add recipients: Enter names/emails and define your signing order (sequential or parallel).
- Send: Click “Send for Signature”—recipients get instant email links to sign.
- Track in real time: Use the dashboard to see document statuses (Sent, Viewed, Partially Signed, Completed) and per-recipient progress.
- Automate follow-ups: Turn on reminders and send manual nudges to “Viewed but not signed” recipients.
- Save your audit trail: Once complete, download the signed document plus the full event log for compliance and record-keeping.
Ready to simplify your document signing? Try QuickSign for free - generate 2 documents and send 1 document to unlimited recipients at no cost. No credit card required.